
AmbiVision PRO Install Guide

Multi-language manuals:


Read this manual before you start using AmbiVision PRO. Obey all instructions and warnings (marked by a yellow triangle with an exclamation mark) to avoid injury or hardware damage.
If you are looking for instructions for the original AmbiVision, click here.
If you are looking for the manual for AmbiVision Wizard (the first version), click here.
LabTeam Innovations LTD is not responsible for hardware damage if this manual is not followed, and the warranty will be voided.
SAFETY PRECAUTIONS
1. The device should not be used by children under 16 years old.
2. Do not insert fingers or any items into the device.
3. Avoid contact with fluids. Do not swallow any items of the set.
4. Keep in a dry location not accessible to children.
5. Modifications can be done only by the manufacturer.
6. The manufacturer is not responsible for bodily injury or damage to equipment due to improper handling.
Table of Content
AmbiVision Wizard - Smartphone App
Install AmbiVision Wizard App on your smartphone to control the system.


LED strip setup
The recommended distance between the wall and the LED strip is 3-20 cm to achieve the best visual effect.
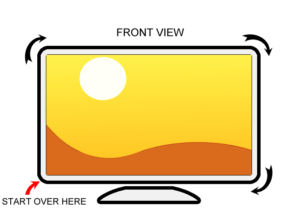
To install, stick the LED strip around the screen back, close to the TV edges. AmbiVision PRO can be installed in 2 ways (default start of sticking is from the left corner):
1. Looking at the back of the TV, start from the right lower corner and go up, left, down, right.
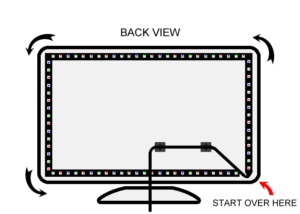
2. Looking at the back of the TV, start from the middle of the bottom side and go right, up, left, down and right to the beginning of the LED strip.


The LED strip is bendable, but some parts cannot be bent. Only bend places without solder and LEDs.

The extra part of the LED strip can be cut off with scissors. If you do not cut it off, the Magic Link will not detect a proper number of LEDs on the LED strip, and you need to put the values manually.
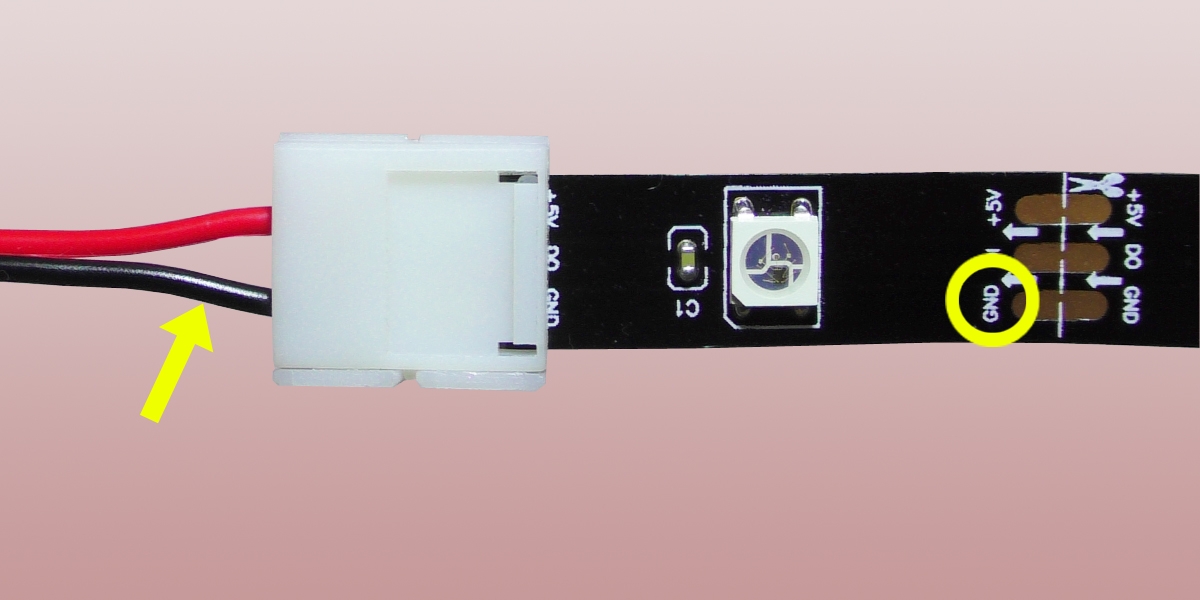
"Power loop"
To reduce colors changing along the LED strip, please make a LED strip “loop” to balance voltage drops. Depending on your LED strip model, connect the “power loop” according to the below scheme:
LED strip model SK6812:

Please note that polarization is relevant: connect “GND” to the black cable and ”+5V” to the red line. We suggest using the top layer of the LED strip instead of the bottom layer (despite the act that it is more “natural”) due to a thin glue layer covering the pads.
LED strip model WS2813:

Please note that polarization is relevant: connect “GND” to the black cable and ”+5V” to the blue line. Snap the clip and squeeze.
This device uses nominal input voltages of 110 – 240 V AC and it automatically selects the correct input voltage. It is designed to work with a single-phase power system having a grounded neutral conductor. To reduce the risk of electrical shock, do not plug into any other type of power system. Connect the device with all peripheral equipment before turning it on.
The brightness in the room has a great influence on quality. It is recommended to limit the ambient lighting to get the best effect.
Magic Link - wireless LED strip controller

① DC INPUT (5V 3A or 6A)
Connect to the power supply adapter.
② LED strip plug
Connect to the LED strip.
We suggest placing the MagicLink at the back of the TV, near to the edge with some distance (to do not touch the enclosure directly) to the TV enclosure using zip ties and sticky bases. This way, you should decrease TV’s shield influence on the radio range.
Connect the MagicLink to the LED strip using 3 pins connector. Use zip ties and sticky bases to stabilize Magic Link on the rear of the TV. After making the „Power loop”, connect the power adapter to the Magic link and plug it into the power grid. MagicLink automatically determines the count of LEDs and LED strip types (RGBW or RGB – to change to another type, use the Wizard app ). The calculating operation takes about 2-5 minutes, depending on the LED strip length. The successful result is indicated by “white waves animation”.
If you change the LED strip, you can use automatic LED strip recognition again:
1. Unplug an LED strip from the MagicLink and then turn on MagicLink’s power adapter.
2. Wait a minimum of 10 seconds and connect the LED strip.
3. You should see R-G-B-(W) sequence at the first LED – that means the calculating started.
4. Wait about 2-5 minutes until the animation of the white waves starts.
LED strip type and number of LEDs are stored. If you want to change it, you can set it manually in the Wizard application (user settings have higher priority). To set them open: SETTINGS -> click the slider on the right top to open advanced settings -> click LED STRIP -> set LED STRIP TYPE
AmbiVision PRO controller

① Fisheye lens camera
Put the controller camera towards the TV screen.
② DC INPUT (5V 3A or 6A)
Connect to the power supply adapter.

③ Screw holes
④ Mounting holes
Use holes on the bottom of the enclosure to mount the controller on the ceiling or on the wall.
Put the controller in a convenient place facing towards the TV screen (max 5 meters distance). You can use holes on the enclosure’s bottom to mount the controller on the ceiling or on the wall. Thanks to the fisheye lens, you can place the controller close to the screen, even at a high angle. The horizontal angle is 180 deg, vertical is 140deg.
You can check what the camera sees in the app – the CAPTURING tab (click the refresh button 🔄 to check camera viewing).
If you change the orientation of the controller, you should conduct screen seeking again.
Please note that the camera has seen the screen without any obstacle!
Two indicating LEDs are located inside the box (visible from the controller front):
– the green light on means shutdown mode (disabled device)
– blinking red light means MagicLink discovering, screen tracking in progress or firmware update in progress
– alternatively blinking of green and red LED means infrared remote control programming or request to the user if Philips HUE connecting in progress (user must press the button on Philips HUE bridge)
Quick start
We suggest reading whole the manual before use. However, if you want to speed up the setup, do step-by-step:
1. Stick the LED strip behind the TV starting from the left lower corner looking from the front/or starting from the middle bottom of TV (check the LED strip setup section in this manual).
2. Connect the power adapter to the Magic Link (read above instructions on how the MagicLink should be placed). The Magic Link starts counting the number of the LEDs. It will take 1-3 minutes. Time depends on the length of the LED strip.
3. Wait until the Magic Link shows you short white wave animation. It indicates that the Magic Link recognized LED strip and wireless network is ready.

4. Plugin the AmbiVision PRO controller to the power adapter. Wait to boot up – red LED inside the camera will start blinking.
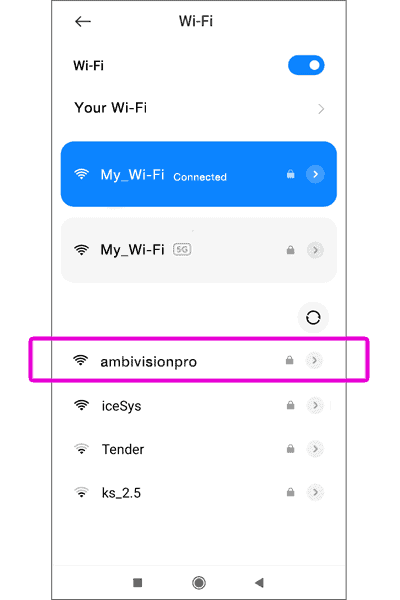
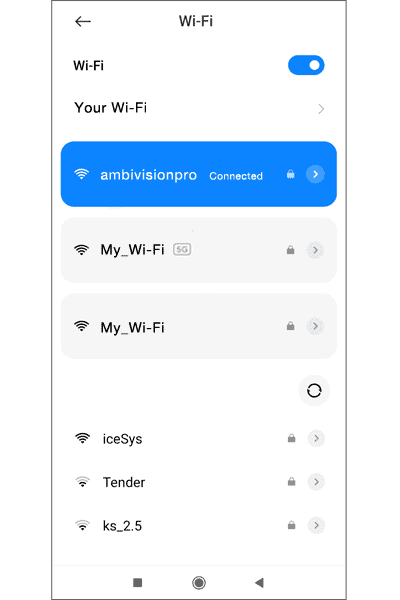
 available networks. Click into the “ambivisionpro” network and connect using the password below (“ambivisionpro” should appear within 1-2 min after plugging into the power grid). Please note that “ambivisionpro” network is available for 2-3 minutes – then the device will work as a client (automatically switch to your network, if you provided your network credentials).
NETWORK NAME: ambivisionpro
PASSWORD: 12345678
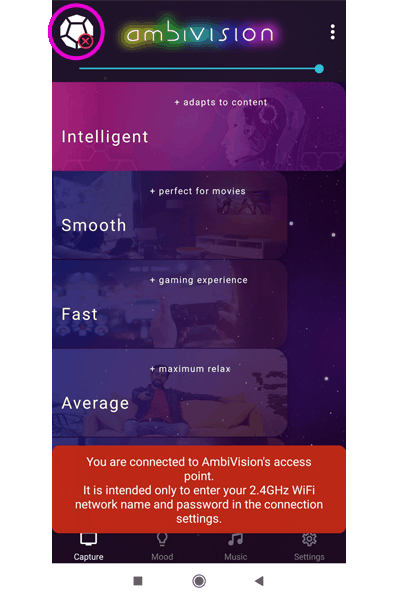
6. Launch a Smartphone AmbiVision PRO Wizard app and wait for auto-connection (works only if you use a single device, otherwise you need to select one from the list). Look at the DEVICE icon in the left top corner. Green sign mean that the AmbiVision PRO is detected and you can connect with your WiFi.
* The Magic Link will connect to the app later – after when you connect to your local WiFi.
* Make sure that the ambivision name on the top has colorful glow – it means that device is turned on.


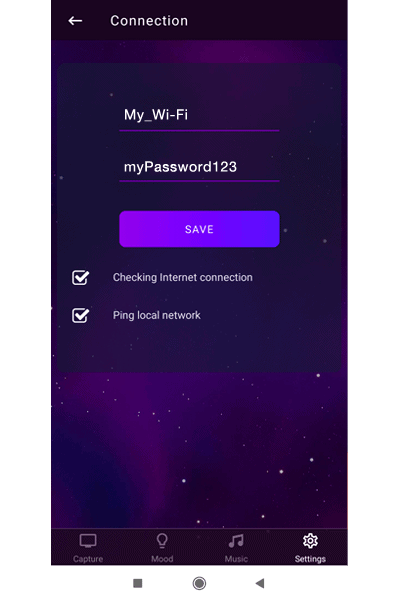
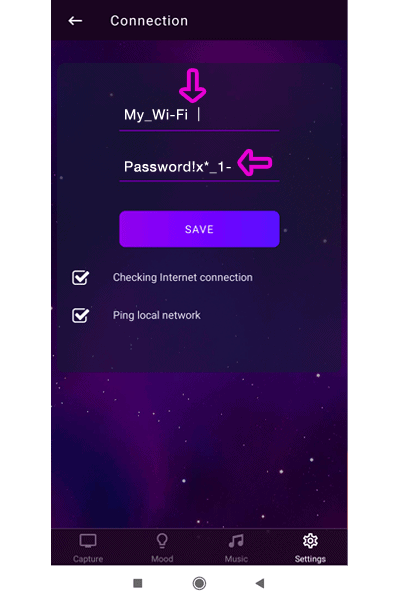
7. Go to the CONNECTION tab in SETTINGS. Enter your WiFi id and password, and save.
Once you enter WiFi id and password properly, the device disconnects the “ambivisionpro” network, then connect to your local network. Please note that the controller support only 2.4GHz, but usually, WiFi routers provide 5Ghz and 2.4Ghz, so you should connect to the 2.4Ghz to control the system.
8. Restart the app and wait for the auto-connect. The lights should turn on in a while.
9. Open the app -> go to SETTINGS -> CAPTURING -> then verify the screen position in the camera view window. If there is no result or wrong photo, click on the REFRESH button to update the image (the second button from the left). Drag and drop the red points to mark the screen corners. Ensure that red points are located on the screen, not no on the TV’s frame. The red points order is not relevant.

10. Go to the LED STRIP tab and set LED STRIP STARTING POINT and WALL COLOR. Then back to the CAPTURING tab and change SCREEN ORIENTATION to align colors on the LED strip to the screen. Select your screen type below.
11. At the end, you should adjust the system to your screen to get the amazing, colorful effect. Go to COLORS CALIBRATION section at the end of this manual.
NOTE: Every time you switch networks on your phone, you have to restart the app.
NOTE: Every time you restart the device, the controller for 2-3 minutes works like an access point, so right after power-up, you will not see the device in your app when you are connected to your local network.
Colors calibration
Every screen has a different viewing angle, brightness, and color saturation. Follow the colors correction steps to adjust the system to your screen to achieve the perfect ambient light effect. Before you start play any real video at your TV. It’s important to not make calibration using the stable image or abstract video. The AmbiVision use a smart algorithm that adjust to the moving content on your screen.
- Set the Auto camera gain range (in the Camera tab). Using this feature, you can set how the camera sees the colors. If the gain is too high, the camera see colors brighter. If the gain is too low, the camera sees the colors darker than they really are. For example, if the colors displayed on the led strip are whitened, set low gain; for example, set 5-100 and check the effect. The default camera gain is 30-160.
- Correct white using the RGB camera gain (in the Camera tab). The rule of calibration colors is simple: if white is reddish, you should increase a little blue and green and decrease the red – in the RGB camera gain. Make it similar if another color is too intensive.
- If it’s needed, adjust colors levels in the Colors tab. Remember that the gamma correction works the other way around. For example, if you set a higher red gamma level, it will limit red. We suggest not making significant changes in this tab.
Summarizing: if you change any setting, do it using small steps. Modify a color level a little and check the effect on the led strip. If it is needed, change a level a little again etc.
If the effect has worsened and colors are incorrect, click the Restore default button in the Colors tab, set the default Camera gain range, and start the calibration again.
If you need any help with colors calibration, don’t hesitate to get in touch with our technical support via:
skype: labteam.innovations
or
facebook (https://www.facebook.com/AmbiVision.TV/)
Our technical support will help you in a short time with pleasure.
Software update
The AmbiVision PRO controller software can be updated using the Smartphone app. Note that the camera has to be connected to your local network with Internet access (check QUICK START section to find out how to connect with WiFi).
Open the app, go to the SETTINGS -> ABOUT -> click UPDATE FIRMWARE. The red color should start circulating on the strip. Updating should take 1-3 minutes (depending on the internet speed) – any interrupt can cause the device damage. When it is finished, the led strip should light on green and in the main controller, you should see red and green LED blinking alternately. It is recommended to reset power adapters and restart the app after updating.
You can check your current software release in the device list (click on the controller icon in the app located at the top left corner).
The latest firmware version for controllers:
– main controller with a camera: v36
– Magic Link: v7
IMPORTANT: The Magic Link has no internet access, so it is impossible to update it remotely. To update the Magic Link, you should send it to us for update. It will take 2 working days; then we will send it back to you. Another option is to order a new Magic Link with the latest software. Please contact us, if you want to buy a new Magic Link.
Capture mode

Intelligent
Smooth
Smooth mode helps to achieve the best reduction of eyestrain.
Fast
In fast mode, the smooth is off. This mode increase eyestrain due to light’s fast-changing.
Average
In average mode, the lights behind the screen are a mean value of the colors of the screen.
User mode allows us to set custom settings of smoothing, dead zones, or eyestrain reduction. Go to SETTINGS -> PROFILES to set a custom user profile.
Mood mode
The mood mode can work in two ways: static or fluently changing colors. That allows you to create a pleasant atmosphere and reduces your energy cost by replacing the lighting in the whole room to energy-efficient LED lights behind a screen.
Set MOOD mode animation speed in ADVANCED SETTINGS -> MISCELLANEOUS TAB.
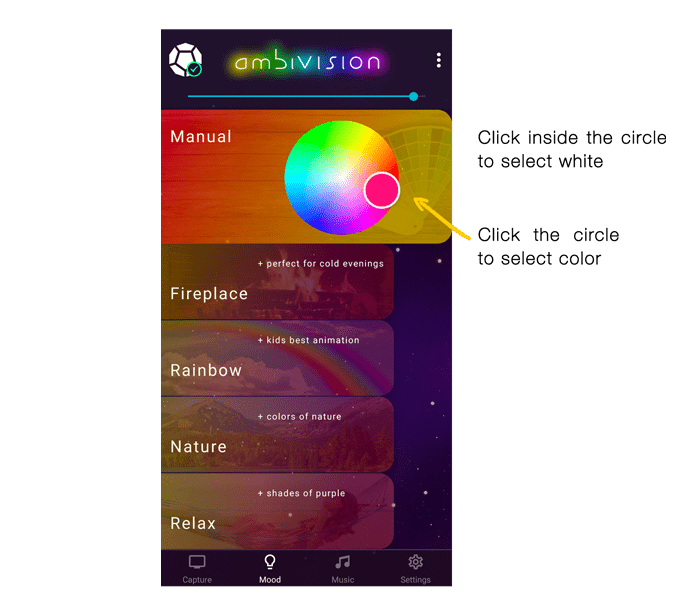
Manual
The color on the LED strip is static. Click on the circle to choose the color (to choose white – click inside the circle).
Red and orange shades are simulating the fireplace.
Rainbow
The colors on the LED strip are fluently changing as in the rainbow.
Nature
This mode creates shades of green (the shades are changing fluently).
Relax
This mode creates shades of sunset (the shades of blue and violet are changing fluently). You can use it during yoga.
Music mode
Thanks to the colorful LEDs and 5 different effects AmbiVision creates an awesome party mood.
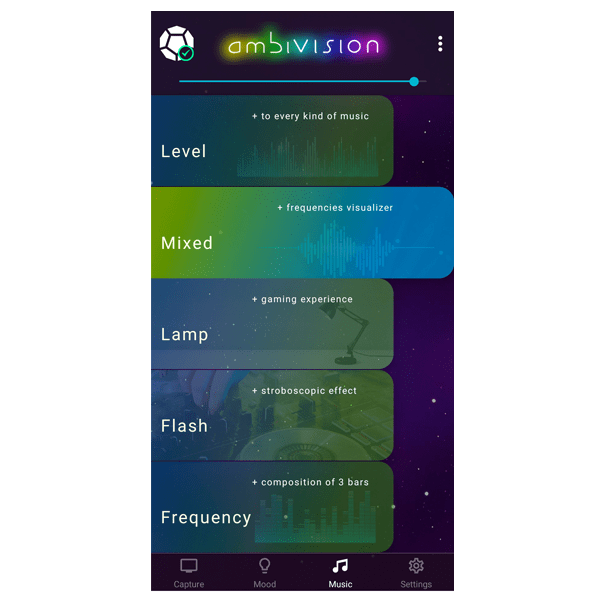
Level bins
The simplest effect and neutral for any kind of music. Green bars on the top, left and right sides and red bar on top means overload.
Mixed bins
The power bar with color depends on audio frequencies.
Lamp
All LED lights colors depend on audio frequencies.
Flash
The white blinking light on beats
Frequency bins
It is a composition of the three bars (for low, medium, and high frequency).
Connected devices
To check connected devices, click on the DEVICE icon in the main screen’s left top corner.

If you see the name of the controller and version of the firmware (v7, v31) it means that these controllers are connected.
The green color of the connected device means that this device is controlled at the moment.
The yellow color of the connected device means that it is saved and detected in the past, but not connected at the moment.
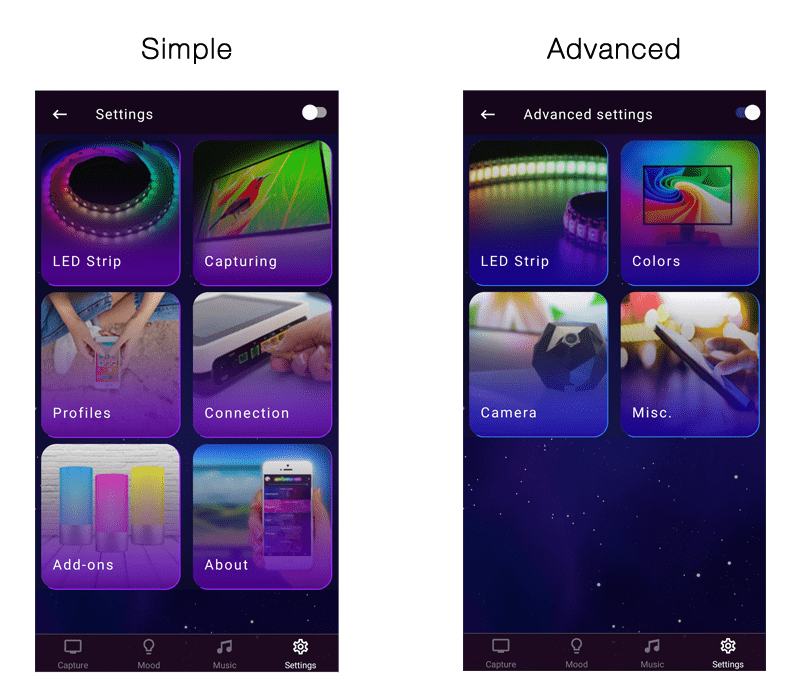
Simple & advanced settings
To open ADVANCED SETTINGS click the slider on the right top of SETTINGS tab.
LED strip
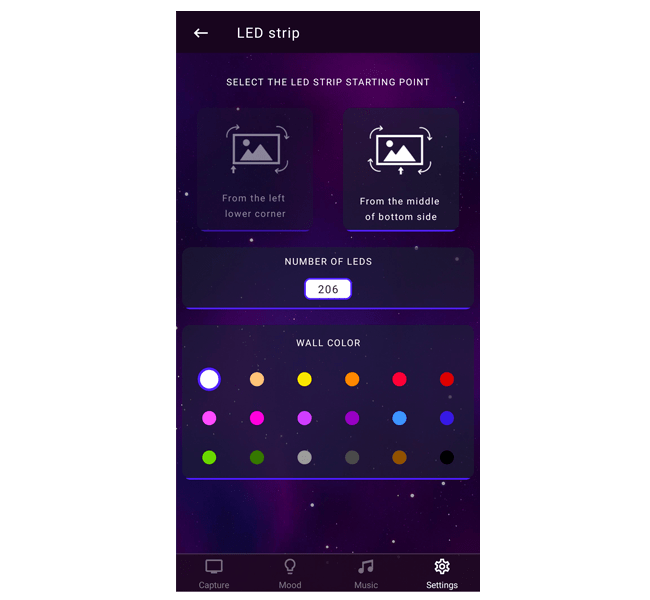
Select LED strip starting point
Set the starting point of sticking the LED strip (looking from the front of the TV). This setting is required to align the effect on the LED strip to the colors on the screen.
Number of LEDs
Magic Link automatically determines the number of LEDs. This setting shows how many LEDs are connected to the Magic Link. To set the numbers of LEDs on each side, open ADVANCED SETTINGS -> LED STRIP.
Wall color
Thanks to the wall color correction, you can get perfect colors regardless of the wall color. Please click on appropriate circle which reflect your wall color the most.
Capturing
Start screen seeking if the result is not proper (you can also set it manually). The image in the app is refreshed with every ‘screen seeking’ procedure.
1. Please keep environmental lights as dim as possible.
2. Display bright and static content on TV and press the run SCREEN SEEKING button (the first on the left).
3. Seeking starts when sides are blinking on red, green then blue for a second. During this time, any moving objects can make calibration not accurate enough.
4. After a few seconds, the result of the calibration will appear in the application. Red points mark corners of the screen. You can set them manually by dragging the points to screen corners (points should be set on the screen, not on the TV frame). The red points order is not relevant.
Click the REFRESH button to see how the camera sees the screen and check whether the points are marked correctly.
Orientation
In this setting, you set the direction of the red points. You can select four orientations: 0°, 90°, 180°, 270°. Use it to align colors on the LED strip to the screen. Check every orientation and choose this that matches.
Select your screen type
Set screen type to adjust the system to your screen.
Profiles

Dead zone
It is the opposite of the eyestrain reduction. It dims weak colors.
Set the minimum luminosity during dark scenes. Note that a high level of Eyestrain reduction cause that all effect colors are strongly whitened.
Eyestrain mixing type
To keep a minimum luminosity level, eyestrain reduction mix a current color with an average of a whole screen or white color. Using this slider, you can choose which is better for you.
Smoothing
Smoothing gets a “delay” impression; thus, 0 here means minimum delay and no smoothing.
Screen refresh rate
Adjust the camera refresh rate to fit it to your screen refresh rate. Change it if you noticed periodic LEDs flickering or if you want to get a quicker response time.
Connection

Open on your Smartphone -> SETTINGS -> WiFi NETWORKS -> refresh available networks list and connect to the “ambivisionpro” network using the password below (“ambivisionpro” should appear within 1-2 min after plugging into the power grid). Please note it is available for 2-3 minutes – then the device will work as a client (automatically switch to your network, if you provided your network credentials).
| NAME: ambivisionpro | PASSWORD: 12345678 |
Next, set your local network name and password in the application settings. Now you can use your smartphone in your local network to change modes or settings.
Checking Internet connection and Ping local network – we recommend leaving them marked.
Add-ons
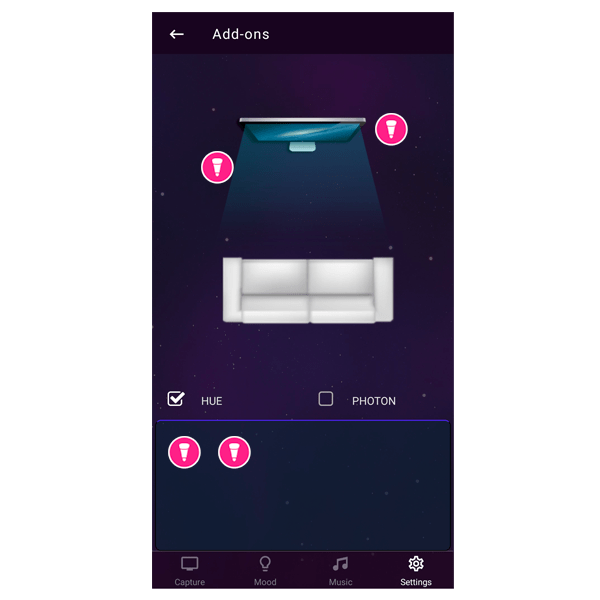
The AmbiVision Pro supports Philips HUE in entertainment mode. This mode allows 25 refreshes per second and no delay between the lights. The entertainment mode required the latest firmware in all HUE RGB lights and bridges.
1. Firstly, use the Philips HUE app to establish an entertainment area. If you have several areas established, you have to call one (the one you want to work with AmbiVision) as “AmbiVision”.
More about Philips HUE: https://www2.meethue.com/en-us/support/entertainment
2. Then, go to the AmbiVision Wizard app -> SETTINGS -> ADD-ONS -> check the HUE checkbox.
3. Observe the AmbiVision controller. Once you notice blinking LEDs inside the controller, user action is required. Thus, press a button located on the Philips HUE Bridge.
4. Wait up to 3 minutes and restart the Wizard app to get the latest lights list in the HUE tab (as a bulb icon in the bottom part of the HUE tab).
5. Grab the first bulb and move it near the TV’s image. Your bulb will get colors from the set place. If you put the bulb above the screen, then your bulb will light up the same as the LED strip in the same part of the TV.
6. Tap the bulb icon twice to open the settings options for the bulb.
Philips HUE needs some time to wake up in entertainment mode; therefore it is expected that the lights start after 10-30 sec after turning on the AmbiVision.
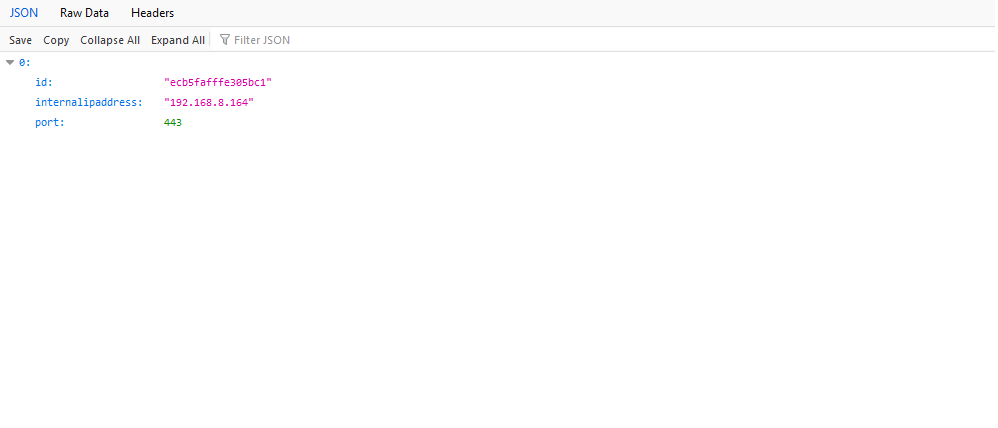
If any problems with the HUE connection appear, click the below link to check your HUE status:
https://discovery.meethue.com/
If the status shows the id, internal IP address and port as below, it means that HUE works correctly and is connected with AmbiVision. If the page is blank, the HUE is not connected or blocked the connection with AmbiVision, so you should restart the HUE and reset the router to make a connection.
About us
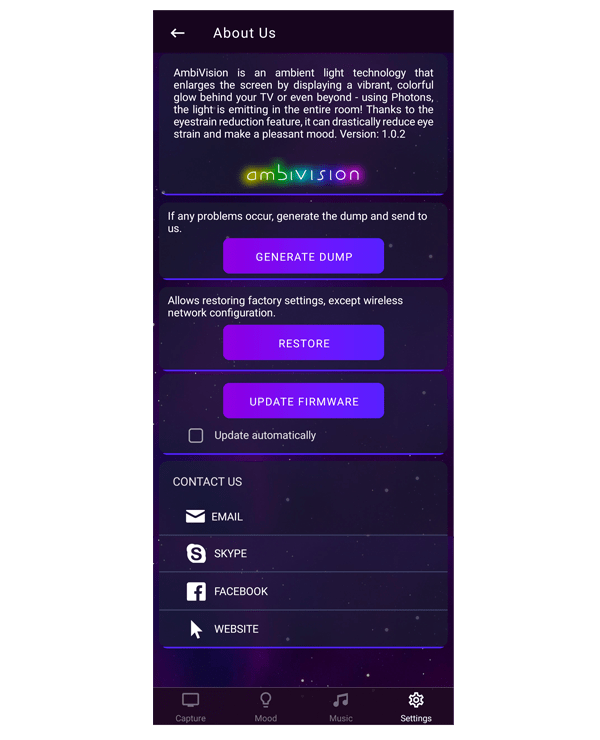
Generate a dump file
If the support team requires a dump file, you can generate it by click on this button. We will analyze the data from the dump file to find what causes the problem.
After clicking the Generate button, then the app will open your mailbox as a new message and attach the dump file to the email automatically as a code. Please send this email to our address: support@ambivision.tv. Remember to add a problem description at the beginning of the message.
Restore
Update firmware
Click on this button to check if a new update is available and then update the app. The latest firmware version will be downloaded and install automatically. More in the software update section.
LED strip
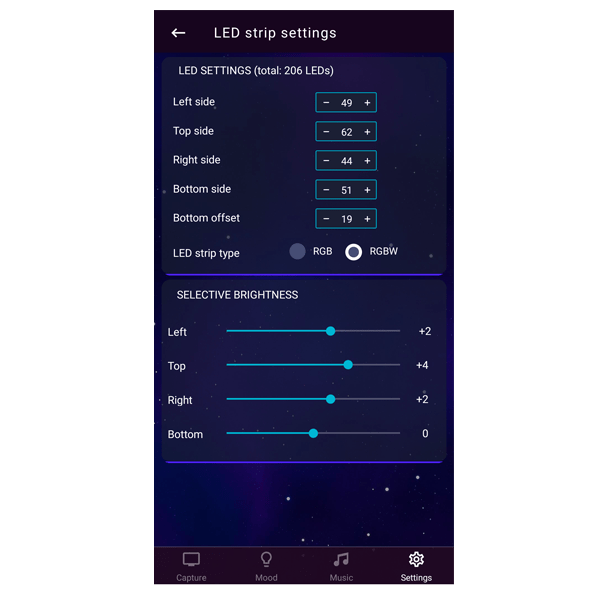
LED strip settings
MagicLink automatically determines the number of LEDs. The calculating operation takes about 2-5 minutes depending on the LED strip length. A successful result is indicated by “white waves animation”. If the MagicLink made mistake in counting, you can set manually the number of LEDs on each side of the TV. Count manually numbers of LEDs on the LED strip and change the number in the app. While changing LED Strip properties the device automatically switches into standby mode. The total number should not exceed 255 LEDs.
Bottom offset
Use this option, if you start sticking the LED strip starting from the middle bottom of the TV. Count manually the number of LEDs on the LED strip from the middle bottom to left edge of the TV (looking from the front of the TV). Enter this value to the bottom offset.
Left side in the app means left side of LED strip, looking from the front of TV.
LED strip type
Using LED strip types selection, you can choose what type of LED strip you use: RGB or RGB+W. The MagicLink automatically detects LED strip type, so this setting is needed when not default LED strip type connected.
Selective brightness
Adjust the brightness of the LED strip:
– Decrease the brightness if your TV edge is very close to the wall
– Increase the brightness if your TV edge is far from the wall
– If you have curved TV, you can decrease the brightness on the top and bottom to compensate for the brightness with both sides or increase the brightness on the left and right sides.
Color settings
The color settings tab allows you to adjust or personalize colors. Monitors or screens use non-linear characteristics, so it is hard to get perfect colors on LEDs using default settings.

Gamma correction
You can adjust the colors of the LED strip using this setting. If your white is a little blue (cold white), you can try to decrease blue or increase red and green. When you are changing gamma, you should check how white is displaying.

Color saturation
Using this setting you can set the maximum value of red, green and blue. Use color saturation to achieve a perfect white color.
Camera
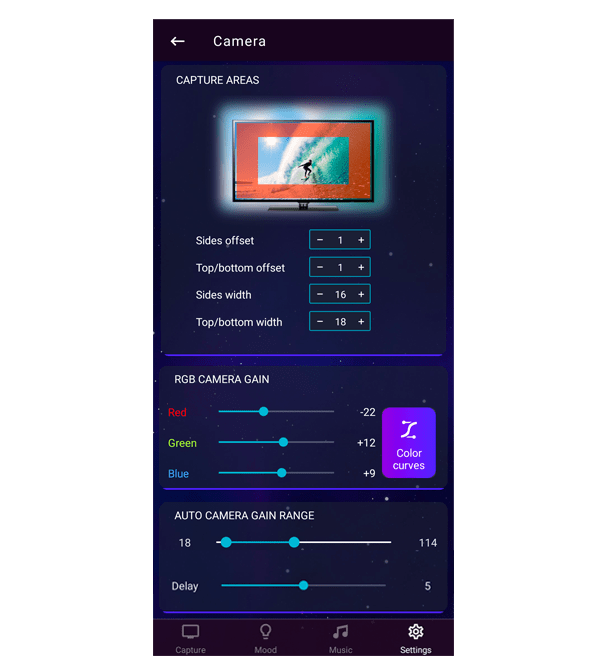
Capture areas
The default settings of the capture area are the most optimal, but you can change it using:
– Sides offset – it is the distance between the edge of the screen and the capture area on both sides of the screen. When you made changes of this value, you will see how to capture area is changing on the animation in the app (it is expressed in % of a whole screen)
– Sides width – it is the width of the capture area. Note that greater area means fewer noises, so less flickering and better color accuracy.
Look at the picture in the app, how to capture areas are changing.
RGB camera gain
Use it for white correction. Play white content on your screen and correct colors as in the below example:
Auto camera gain range
In the camera gain range, you can set how the camera sees the colors. If the gain is too high, the colors will be almost white. If the gain is too low, the camera will be seen the colors darker than they really are.
Delay
Set the reacting time of the system. If you like fast changes, set a small delay (recommended for games). If you want to achieve fluently colors changes, set delay in the middle of the axes.
Color curves
Color curves are used exclusively in the capture mode, and it helps if colors are wrong.

Miscellaneous

- The system can turn on/off automatically with the screen, or you can turn on/off in the app -> just click the ambivision name on the top of the app.
We recommend not unplug power adapters because the connection with wifi takes a couple of minutes and can cause connection problems. The system stays in standby mode, and the power consumption is limited to a minimum.
In the miscellaneous tab you can set a threshold of the auto turning on/off.
If the system turns off during dark scenes, we recommend setting:
On threshold set to 10
Off threshold set to 10
Env. Light set to 7
On threshold
The automatic turn-on feature observes your screen whether any movement occurs. Use this slider to set the turn-on action threshold – a higher value means that smaller movement on the screen is needed to trigger turn-on action.
Off threshold
The automatic turn off feature check colors intensity and movement on the screen. Use this slider to set the turn off action threshold – a higher value means that the screen needs to be black without any movements on the screen are needed to trigger turn off action.
Keep working only in the dark
The lights will work only in the dark. It applies only to the capture mode. If you turn on the device manually, this setting does not matter – the light will work despite on bright environment.
Environmental light
Set the threshold to prevent turn-on action if daylight detected.
Turn on night light after shutdown
When you turn off the screen, AmbiVision PRO lights up for 30 seconds to
escort you safely to bed. You can still control the lights by remote
control.
Switch to the mood mode after shutdown for 15 min
After you turn off the TV, the system will light up in the last using mood mode.
Apply automatic on/off for all modes
The system turns on/off automatically with the TV, regardless of the selected mode.
Set the mood mode effect speed
Program remote control
AmbiVision PRO can be controlled by remote control. The kit does not include remote control, but fortunately, any infrared remote control that works on a 38kHz carrier can be used.
Find three unused buttons on your remote to control AmbiVision PRO:
– A mode change button(1st button)
– A sub-mode change button (2nd button)
– A standby button (3rd button)
Usually, colourful tele-text button are the best, because they are no longer in normal use.
1. Press the “START PROGRAMMING” in the smartphone app. The red LED inside the controller should blink
2. Press the first button, release for a while (less than 1s), and press again the same.
3. Wait around 2 seconds and execute the step 2 again using the next remote control button (the way of the blinking should change)
4. The red blinking LED should stop blinking. It means that your remote control is programmed.
5. If issues occur, repeat the programming procedure.
The maximum operating range for the remote control is about 5 meters.
Colors calibration
Every screen has a different viewing angle, brightness, and color saturation. In the beginning, you should adjust the system to your screen. The rule of calibration colors is simple – for example: if white is reddish, you should increase a little blue and green and reduce the red in the color setting tab. Make it similar if another color is too intensive.
You can also try to set similarly in the camera tab -> RGB camera gain. In the camera gain range, you can set how the camera sees the colors. If the gain is too high, the colors will be almost white. If the gain is too low, the camera will be seen the colors darker than they really are.
Make a calibration using small steps – change a level a little and check the effect. If it is needed, change a level a little again etc.

Troubleshooting
1. The system is not connected to the app (wifi).
Restart both power adapters.Next, follow the below step-by-step (if you have done this before, please repeat the connection steps ).
1. Connect with ambivisionpro wifi network, open the app, and click the device icon in the top left corner.
2. If the Ambivision pro appears, go to the connection tab and enter your wifi name and password.
3. Restart the app and wait for a connection.
IMPORTANT! Entered WiFi name and password must be the same as during the usual connection with WiFi. Don’t forget to add all special characters, remember about capital letters, and remove the space at the end of the name if it appears.
Please note that the controller support only 2.4GHz, but usually, wifi routers have 5Ghz and 2.4Ghz, so you should connect to the 2.4Ghz. You can try to reset your wifi router, which often solves the problem with the connection.
If the issue still exists, the problem can be with the router settings – sometimes, 2.4GHz networks are disabled in the router settings. Many connection attempts can block the ports in your router as well. In this case, the router resetting and smartphone restarting should solve the problem.
If the problem still appears, please chat with our technical support available on:
skype: labteam.innovations
or
facebook (https://www.facebook.com/AmbiVision.TV/)
2. The Magic Link is not connected to the app
Reset the Magic Link power adapter. The light should appear at the beginning of the LED strip. It means that the Magic Link is counting LEDs. When counting is finished, the white wave should appear around the TV. After the white wave, the Magic Link starts connecting with the camera and app (it can take 1-3 minutes).
3. Reset of the Magic Link
– Unplug the Magic Link from the LED strip and unplug the power adapter to make a reset.
– Then, plug only the power adapter for 15 seconds (it will reset the Magic Link).
– Connect Magic Link to the LED strip again and plug in the power adapter. The Magic Link will start counting the LEDs.
– When it is finished, you should see a white wave on the led strip.
4. No light at all
– Check in the app (click device icon in the left top corner) whether the AmbiVision PRO and Magic Link are connected. The green color of the connected device means that this device is connected and controlled at the moment. The yellow color of the connected device means that it is saved and detected in the past, but not connected at the moment. If the system is not connected to the app, go to point number 1.
– If the AmbiVision PRO and Magic Link are connected, ensure that the system is turned on. Click the ambivision name on the app’s top. When the glow appears around the name it means that the system is turned on.
– Check your current mode and try to set mood mode.
– Verify LEDs number and color settings.
– Check power adapters.
5. The lights are not aligned
– Conduct automatic screen seeking (CAPTURING tab) or set red points on the screen corners manually in the Wizard. Set the orientation in the CAPTURING tab.
– Set the LED strip starting point in the LED strip tab.
– Verify LEDs offset value and LEDs numbers on each side – note that default position is lower-left corner looking from the front of the screen. You can find this setting in the ADVANCED SETTINGS -> LED STRIP
6. Connection drops
– Try to reduce the distance between MagicLink, Router and the main controller.
– Try to keep MagicLink and the main controller as far as possible from metal items. Look at the suggested way of the mount.
– We suggest placing the MagicLink on the TV edge.
– Check if there are some other devices that can interfere/ping to the AmbiVision kit.
– Check wires connection.
– Make sure that both settings in the app are checked: SETTINGS -> CONNECTION -> Check PING LOCAL NETWORK
7. Capture mode does not work at all
– It seems that the screen was not found. Conduct screen seeking or set screen position manually (CAPTURING tab).
– Clear “colors calibrating result” – if you accidentally used “Colors calibration” without calibration video, it can get weird or blanked colors.
8. The device does not turn on/off automatically to/from the capture mode
– Verify your screen seeking a result.
– Check on/off thresholds in the app (ADVANCED SETTINGS -> MISCELLANEOUS -> set ON and OFF threshold on +10
– You may have accidentally enabled checkbox: “Keep working only in the dark”.
9. Flickering only in capture mode
If LEDs are flickering strongly, please check your movie FPS and notify us about that. Please display some static content with the same FPS, verify the capture area and wait for self-adoption. You can try to turn on eye strain reduction or increase smoothing. Make sure that the red points are matched correctly to the screen in the CAPTURING tab.
10. Flickering in all modes
It seems that the LED strip has a bad connection or the LED is damaged. Unplug the power adapter from the Magic Link and disconnect the “power loop”. Plug-in power adapter again and check the effect. You can connect the power adapter from camera to the Magic Link and check the effect.
8. Can’t update firmware
– Place the device close to the router to get a stable connection.
– Restart the box after every attempt.
– If you use <1.31 FW, you can set the box time manually (time has to be synchronized in order to update).
10. Main controller reset
Open the app, go to SETTINGS -> ABOUT US -> click RESTORE button. After this, you should:
– Unplug and plug again the power adapter
– Connect with ambivisionpro network
– Enter your local wifi id and password again
11. Generate Dump log
If the support team requires a dump file, you can generate it by click on this button. We will analyze the data from the dump file to find what causes the problem.
If you have a problem with connection, please reset power adapters and enter the wifi name and password again. Wait for connection with the app a couple of minutes, open the app -> SETTINGS -> ABOUT US-> click Generate dump log.
After clicking the Generate button, then the app will open your mailbox as a new message and attach the dump file to the email automatically as a code. Please send this email to our address: support@ambivision.tv. Remember to add a problem description at the beginning of the message.
If your problem cannot be solved easily by you, please write to support@ambivision.tv , use our skype labteam.innovations , or send us message on our Facebook Page.
Docs
FCC ID AmbiVision Controller:2AI4I-AP6212; FCC MagicLink ID:2ADMFHC06;